
관리 메뉴

빙응의 공부 블로그
[AWS][S3] Spring Boot + S3 이미지 저장 본문

📝 시작하기 전에..
AWS의 S3를 이용하려면 S3 버킷을 만들고
IAM 사용자 생성 및 설정을 해서 연결을 해주어야 한다.
1. IAM 사용자 생성 및 설정
2. AWS S3 bucket 생성 및 설정
3. Spring boot 설정
4. Spring boot로 간단한 로직 작성
해당 포스팅은 3, 4번 과정만 사용할 것이며 1, 2번은 아래의 영상으로 확인해주길 바랍니다.
[SWTT] AWS S3를 이용한 이미지 서버 구축하기 with Spring Boot (youtube.com)
'
📝 1. Spring boot 설정하기
📌의존성 설정하기
AWS를 이용하기 위해 의존성 설정부터 해주자
implementation 'org.springframework.cloud:spring-cloud-starter-aws:2.2.6.RELEASE'
그리고 application.yml을 설정해줘야 한다.
왜냐하면 접근할 S3의 정보를 가져오기 위해서이다.
물론 AWS는 버전 업데이트가 자주되므로 최신 버전인지 확인해주자
spring:
  servlet:
    multipart:
      max-file-size: 10MB
      max-request-size: 10MB

cloud:
  aws:
    credentials:
      accessKey: ${AWS_ACCESS_KEY_ID}
      secretKey: ${AWS_SECRET_ACCESS_KEY}
    region:
      static: ap-northeast-2
    stack:
      auto: false

application:
  bucket:
    name: ${YOUR_BUCKET_NAME}
단 IAM 사용자의 AccessKey와 SecretKey는 절대절대절대절대로 노출되어선 안된다.
이것은 요금 폭탄을 맞을 수 있는 가능성이 아니라 사실상 확정이라 절대로 노출안되게 관리하자.
yml 자체를 깃허브에 올리지말거나 git Secret을 이용해서 환경변수로 관리해주는 것이 좋다.
📌 S3Config 설정하기(@Bean)
@Configuration
public class StorageConfig {

    @Value("${cloud.aws.credentials.access-key}")
    private String accessKey;

    @Value("${cloud.aws.credentials.secret-key}")
    private String accessSecret;
    @Value("${cloud.aws.region.static}")
    private String region;

    @Bean
    public AmazonS3 s3Client() {
        AWSCredentials credentials = new BasicAWSCredentials(accessKey, accessSecret);
        return AmazonS3ClientBuilder.standard()
            .withCredentials(new AWSStaticCredentialsProvider(credentials))
            .withRegion(region).build();
    }

}
Config를 통해서 S3의 정보를 빈으로 관리해주자 이렇게 해야 사용할 수 있다.
📝 Spring boot + S3 기초 로직짜기
@Slf4j
@Service
@RequiredArgsConstructor
public class S3UploaderImpl implements S3Uploader {

    private final AmazonS3 amazonS3;

    @Value("${application.bucket.name}")
    private String bucket;

    /**
     * 파일을 S3에 업로드하고 파일의 URL을 반환합니다.
     *
     * @param file 업로드할 MultipartFile
     * @return 업로드된 파일의 S3 URL
     */
    @Override
    public String upload(MultipartFile file) {
        // 원본 파일 이름을 그대로 사용
        String fileName = file.getOriginalFilename().replaceAll("\\s", "_");

        // 파일을 S3에 업로드
        try {
            amazonS3.putObject(new PutObjectRequest(bucket, fileName, file.getInputStream(), null));
        } catch (IOException e) {
            log.error("파일 업로드 중 오류 발생: {}", e.getMessage());
            throw new RuntimeException("파일 업로드 중 오류가 발생했습니다.");
        }

        // 업로드된 파일의 URL 반환
        return getFileUrl(fileName);
    }

    /**
     * S3에서 파일을 삭제합니다.
     *
     * @param fileName 삭제할 파일의 이름
     */
    @Override
    public void deleteFile(String fileName) {
        amazonS3.deleteObject(bucket, fileName);
        log.info("S3에서 파일 삭제: {}", fileName);
    }

    /**
     * S3에 저장된 파일의 URL을 반환합니다.
     *
     * @param fileName 파일의 이름
     * @return 파일의 S3 URL
     */
    @Override
    public String getFileUrl(String fileName) {
        return amazonS3.getUrl(bucket, fileName).toString();
    }
}
정말 간단하게 만들었다. 직접 사용할 것이면 다음과 같은 과정을 거치자.
- 파일 이름에 대한 중복 처리(UUID를 사용하거나 절대로 중복되지 않는 것이라면 그대로해도 좋다)
- 파일 경로에 대한 처리(파일을 경로로 나눠 사용하는 것이 효율적이다.)
- 파일 다운로드 추가, 메타 데이터 정보(S3의 기능을 더 생각하자)
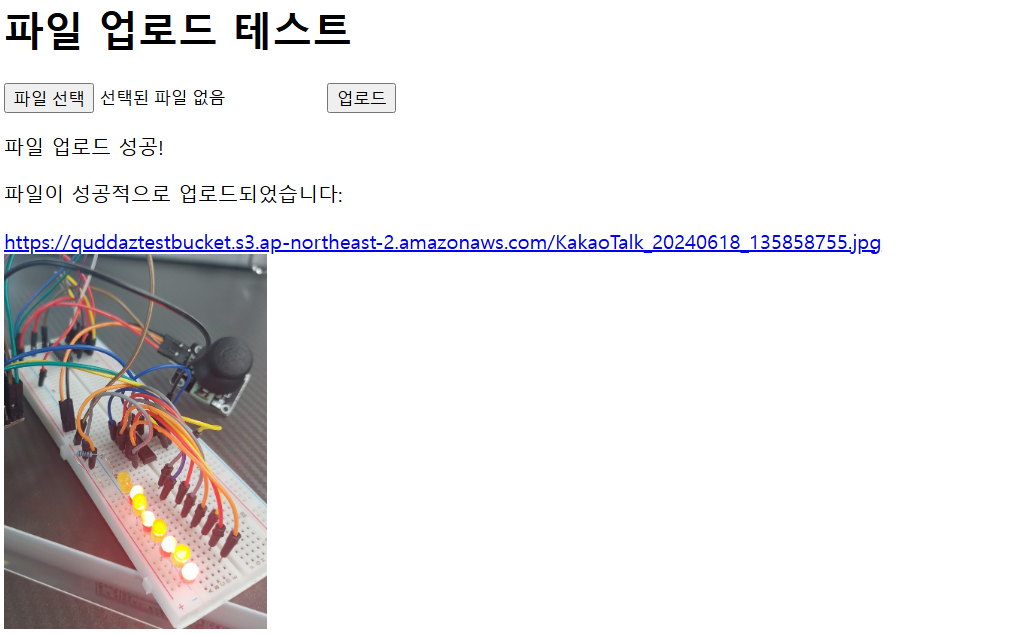
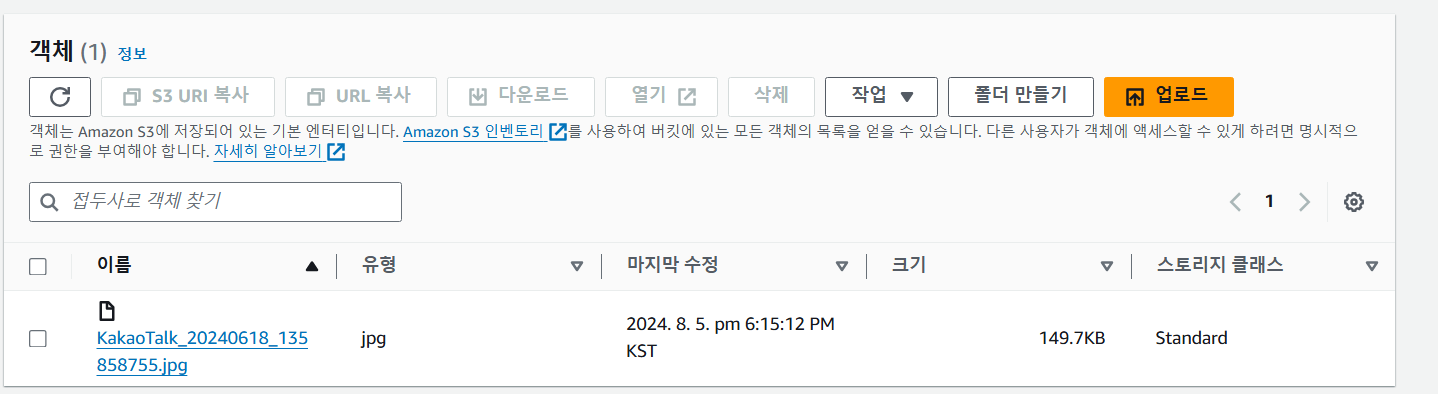
📝 테스트해보기
테스트 컨트롤러
@Controller
@RequestMapping("/files")
public class FileUploadController {

    private final S3Uploader s3Uploader;

    public FileUploadController(S3Uploader s3Uploader) {
        this.s3Uploader = s3Uploader;
    }

    /**
     * 파일 업로드 폼을 보여주는 메서드
     */
    @GetMapping("/upload")
    public String showUploadForm() {
        return "uploadForm";
    }

    /**
     * 파일을 업로드하고 S3 URL을 반환하는 메서드
     */
    @PostMapping("/upload")
    public String uploadFile(@RequestParam("file") MultipartFile file, Model model) {
        try {
            // 파일 업로드 및 URL 반환
            String fileUrl = s3Uploader.upload(file);
            model.addAttribute("fileUrl", fileUrl);
            model.addAttribute("message", "파일 업로드 성공!");
        } catch (Exception e) {
            model.addAttribute("message", "파일 업로드 실패: " + e.getMessage());
        }
        return "uploadForm";
    }
}
테스트 페이지
<!DOCTYPE html>
<html xmlns:th="http://www.thymeleaf.org">
<head>
  <title>파일 업로드</title>
</head>
<body>

<h1>파일 업로드 테스트</h1>

<!-- 파일 업로드 폼 -->
<form method="post" enctype="multipart/form-data" th:action="@{/files/upload}">
  <input type="file" name="file" required/>
  <button type="submit">업로드</button>
</form>

<!-- 업로드 결과 메시지 -->
<div th:if="${message}">
  <p th:text="${message}"></p>
</div>

<!-- 업로드된 파일의 URL 표시 -->
<div th:if="${fileUrl}">
  <p>파일이 성공적으로 업로드되었습니다:</p>
  <a th:href="${fileUrl}" th:text="${fileUrl}"></a>
  <br/>
  <img th:src="${fileUrl}" alt="Uploaded Image" style="max-width: 300px; max-height: 300px;"/>
</div>

</body>
</html>
'CICD > AWS' 카테고리의 다른 글
| [AWS][EC2]EC2 인스턴스 생성 (0) | 2024.08.23 |
|---|---|
| [AWS]EC2와 기본 개념들 (0) | 2024.08.23 |
| [AWS] 클라우드와 AWS (0) | 2024.08.04 |
'CICD/AWS' Related Articles
more


