
빙응의 공부 블로그
[Spring]Chat GPT API 주소 기반 코스 추천 만들기 본문
Team.UniP
Team.UniP has 3 repositories available. Follow their code on GitHub.
github.com
파티를 모집하는 프로젝트 진행 중에 교수님이
"AI 같은거 써보는게 어때?"라고 하셨습니다. 그래서 한번 ChatGPT API 학습 겸 사용하기로 했습니다.
📝주소 기반 코스 추천 API 만들기
사용 의존성
	implementation 'com.fasterxml.jackson.core:jackson-databind' // json 파싱
	implementation 'org.springframework.boot:spring-boot-starter-web'
	compileOnly 'org.projectlombok:lombok'
	runtimeOnly 'com.mysql:mysql-connector-j'
	annotationProcessor 'org.projectlombok:lombok'
	testImplementation 'org.springframework.boot:spring-boot-starter-test'
	testRuntimeOnly 'org.junit.platform:junit-platform-launcher'
	implementation 'org.springframework.cloud:spring-cloud-starter-openfeign' // OpenFeign
application.propertise
spring.application.name=demo
gpt.key=xxxxxxxxx
간단한 테스트 프로젝트이기에 Chat GPT KEY만 설정했습니다.
📌DTO
요청 DTO
@Builder
public record ChatRequest(
    String model,
    Message[] messages
) {
}
ChatRequest는 사용할 GPT 모델과 Message를 설정합니다.
@Builder
public record Message(
    String role,
    String content
) {
}
Message는 GPT에 사용자의 요청과 제한 사항을 보냅니다.
role의 따라 제한 사항을 보낼 수 있습니다. 예를 들어보겠습니다.
message=[
    {
    	"role": "system",
        "content": "유치원 선생님 처럼 해줭"
    },
    {
    	"role": "user",
        "content": "코딩이 뭐에요??"
    }
]- role = System은 GPT의 행동 지침을 의미합니다. 즉 규칙을 세워서 응답을 제어할 수 있는 것입니다.
- role = User는 GPT에 보낼 사용자 요청입니다.
해당 영상에 대략적인 설명이 나옵니다.
응답 DTO
@Builder
public record ChatResponse(
    Choice[] choices
) {
}
public record Choice(
Message message
) {
}응답 DTO는 크게 볼 게 없습니다. 메시지로 user 형식으로 오며 content에서 응답을 합니다.
📝System을 이용해 GPT 응답 커스텀하기
- GPT의 응답을 제어하기 위해서는 다양한 규칙을 추가해줘야 합니다. 특히 응답 구조를 정의해줘야합니다.
@Builder
public record ChatRequest(
    String model,
    Message[] messages
) {

    public static ChatRequest.ChatRequestBuilder defaultGpt35Turbo(String userMessage) {
        return ChatRequest.builder()
            .model("gpt-4o")
            .messages(new Message[] {
                new Message("system", """
                    {
                      "system": ""\"
                      당신은 똑똑하고 유용한 여행 어시스턴트입니다. 사용자가 입력한 주소를 기반으로 인기 있는 술집, 커피숍, 음식점을 포함한 경로를 추천하는 역할을 수행합니다. 사용자가 주소를 제공하면 다음 단계를 따르세요:

                      1. **주소 분석**: 입력된 주소에서 일반적인 지역(예: 도시, 구)을 파악하세요.
                      2. **카테고리 제안**: 해당 위치 근처의 술집, 커피숍, 음식점을 추천하세요. 인기 있거나 평점이 높은 장소에 집중하세요.
                      3. **경로 추천**:
                         - 제공된 주소에서 시작하여 이 장소들을 방문할 최적의 경로를 추천하세요.
                         - 도보 또는 짧은 이동 거리 내에서 합리적이고 효율적인 경로가 되도록 하세요.
                      4. **세부 정보 제공**:
                         - 경로의 각 장소에 대해 이름과 간단한 설명(평점 포함)을 제공하세요.
                         - 응답 형식은 다음과 같은 JSON 구조를 따르세요:

                        {
                          "title": "Analysis Title for the Address.",
                          "courses": [
                            {
                              "name": "Location 1",
                              "content": "Description of Location 1.",
                              "address" : "",
                              "rating": "Rating",
                              "estimated travel time": "Travel time"
                            },
                            {
                              "name": "Location 2",
                              "content": "Description of Location 2.",
                              "address" : "",
                              "rating": "Rating",
                              "estimated travel time": "Travel time"
                            }
                          ],
                          "route summary": "Content of the route summary."
                        }

                      5. 항상 응답을 명확하고 간결하게 구조화하여 제공하세요. 장소와 경로를 나열할 때는 목록 형식(숫자 또는 불릿)을 사용하세요. 사용자가 특정 선호 사항(예: 커피숍만) 제공 시, 해당 선호 사항에 맞추어 응답을 조정하세요.
                      ""\"
                    }
                        """),
                new Message("user", userMessage)
            });
    }
}- Record를 이용해서 기본 요청 객체 생성 메소드를 만들었습니다.
- 이렇게 하면 정확한 응답이 들어옵니다.
📝GPT에 요청 보내기
요청을 보내는 것은 OpenFeign를 사용했습니다.
해당 내용은 다음 링크를 타고 봐주세요
[Spring]OpenFeign
📝1. OpenFeign이란?OpenFeign이란?Open Feign는 선언적인 HTTP Client 도구로써, 외부 API 호출을 쉽게할 수 있도록 도와줍니다.여기서 "선언적인" 이란 어노테이션 사용을 의미합니다. Open Feign은 인터페이
quddnd.tistory.com
이제 요청을 보내기 위해 OpenFeign를 설정하겠습니다.
OpenFeign
@Configuration
@EnableFeignClients("com.example.demo")
public class OpenFeignConfig {
}
@FeignClient(name = "chatgpt", url = "https://api.openai.com/v1")
public interface GptFeignClient {
@PostMapping("/chat/completions")
ChatResponse createChatCompletion(
@RequestHeader("Authorization") String authorization,
@RequestBody ChatRequest chatRequest);
}
Service & Controller
@Service
@RequiredArgsConstructor
@Slf4j
public class ChatGptService {

    private final GptFeignClient gptFeignClient;

    @Value("${gpt.key}")
    private String KEY;

    public ChatResponse getChatResponse(String userMessage) {
        String apiKey = "Bearer " + KEY;
        ChatRequest chatRequest = ChatRequest.defaultGpt35Turbo(userMessage).build();
        return  gptFeignClient.createChatCompletion(apiKey, chatRequest);
    }
}
@RestController
@RequiredArgsConstructor
@Slf4j
public class TestController {
private final ChatGptService chatGptService;
@GetMapping(value = "/gpt")
public ResponseEntity<?> getGpt(@RequestBody String prompt){
return ResponseEntity.ok().body(chatGptService.getChatResponse(prompt));
}
}
결과
{
    "choices": [
        {
            "message": {
                "role": "assistant",
                "content": "
json\n{\n  \"title\": \"Analysis of the Dujeong-dong Area\",\n  \"courses\": [\n    {\n      \"name\": \"Starry Night Bar\",\n      \"content\": \"A popular bar featuring a wide selection of craft beers and live music performances.\",\n      \"rating\": \"4.5/5\",\n      \"estimated travel time\": \"10 minutes walk\"\n    },\n    {\n      \"name\": \"Blue Bottle Coffee\",\n      \"content\": \"A trendy coffee shop known for its artisanal brews and cozy atmosphere.\",\n      \"rating\": \"4.7/5\",\n      \"estimated travel time\": \"5 minutes walk\"\n    },\n    {\n      \"name\": \"Haemil Restaurant\",\n      \"content\": \"A well-rated Korean restaurant offering a variety of traditional dishes.\",\n      \"rating\": \"4.6/5\",\n      \"estimated travel time\": \"8 minutes walk\"\n    }\n  ],\n  \"route summary\": \"Begin your exploration at Blue Bottle Coffee for a refreshing start, followed by a short walk to Haemil Restaurant for a delicious meal. Conclude your evening with craft beers and music at Starry Night Bar.\"\n}\n
"
            }
        }
    ]
}
결과는 해당처럼 content에 """json {}""" 형식으로 들어왔습니다. 이제 이것을 json으로 파싱해서 객체로 보여줍시다.
📝 들어오는 응답 형식 JSON 파싱하기
응답 형식 파싱을 하기 위해서 객체를 만들어주었습니다.
아래는 만들어야 하는 객체의 틀입니다. 저희가 GPT 응답 형식을 제안할때 만든 것입니다.
                        {
                          "title": "Analysis Title for the Address.",
                          "courses": [
                            {
                              "name": "Location 1",
                              "content": "Description of Location 1.",
                              "address" : "",
                              "rating": "Rating",
                              "estimated travel time": "Travel time"
                            },
                            {
                              "name": "Location 2",
                              "content": "Description of Location 2.",
                              "address" : "",
                              "rating": "Rating",
                              "estimated travel time": "Travel time"
                            }
                          ],
                          "route summary": "Content of the route summary."
                        }
JSON 파싱을 위한 DTO 만들기
@Builder
public record PartyDto (    String title,
                            List<Course> courses,
                            @JsonProperty("route summary")
                            String routeSummary)
{
}
@Builder
public record Course(
String name,
String content,
String rating,
String address,
@JsonProperty("estimated travel time") String estimatedTravelTime
) {
}
이제 파싱을 위한 로직을 짜봅시다.
우리가 파싱해야하는 메시지를 앞에 json이 붙어있습니다. 그걸 때줘야합니다.
그렇기에 index를 통해서 때주었습니다.
   private PartyDto parseJsonToPartyDto(ChatResponse chatResponse) {
        String content = chatResponse.choices()[0].message().content();
        String jsonString = extractJsonString(content);

        try {
            return objectMapper.readValue(jsonString, PartyDto.class);
        } catch (JsonProcessingException e) {
            log.error("JSON 파싱 오류: {}", e.getMessage());
            return null; // 파싱 실패 시 null 반환
        }
    }

    private String extractJsonString(String content) {
        // JSON 문자열 추출
        int startIndex = content.indexOf("{");
        int endIndex = content.lastIndexOf("}") + 1;
        return content.substring(startIndex, endIndex);
    }
전체 코드
@Service
@RequiredArgsConstructor
@Slf4j
public class ChatGptService {

    private final GptFeignClient gptFeignClient;
    private final ObjectMapper objectMapper;

    @Value("${gpt.key}")
    private String KEY;

    public PartyDto getChatResponse(String userMessage) {
        String apiKey = "Bearer " + KEY;
        ChatRequest chatRequest = ChatRequest.defaultGpt35Turbo(userMessage).build();

        // GPT API 호출 및 응답 파싱
        ChatResponse chatResponse = gptFeignClient.createChatCompletion(apiKey, chatRequest);
        return parseJsonToPartyDto(chatResponse);
    }

    private PartyDto parseJsonToPartyDto(ChatResponse chatResponse) {
        String content = chatResponse.choices()[0].message().content();
        String jsonString = extractJsonString(content);

        try {
            return objectMapper.readValue(jsonString, PartyDto.class);
        } catch (JsonProcessingException e) {
            log.error("JSON 파싱 오류: {}", e.getMessage());
            return null; // 파싱 실패 시 null 반환
        }
    }

    private String extractJsonString(String content) {
        // JSON 문자열 추출
        int startIndex = content.indexOf("{");
        int endIndex = content.lastIndexOf("}") + 1;
        return content.substring(startIndex, endIndex);
    }
}
결과
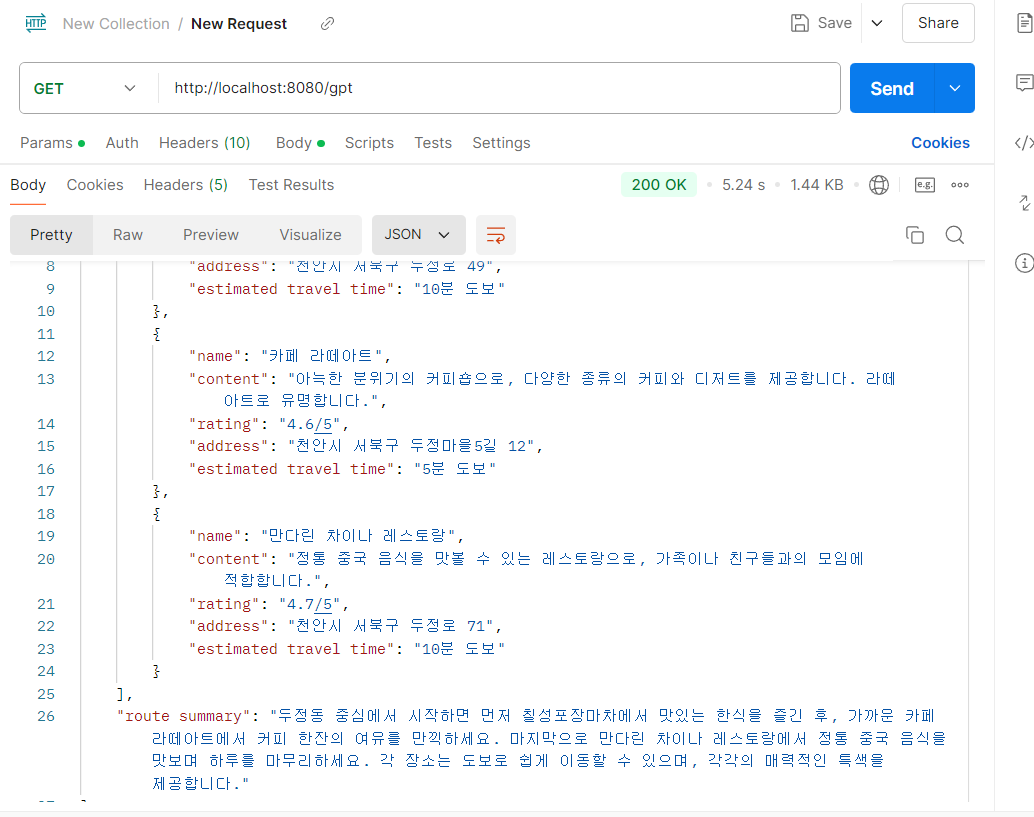
제가 가장 안좋은 GPT를 쓰기에 속도는 느리지만 나온 것을 확인할 수 있습니다!
아래 리포지토리에서 샘플 코드를 확인할 수 있습니다.
my_Lab/OpenFeign/demo at main · quddaz/my_Lab
my_Lab/OpenFeign/demo at main · quddaz/my_Lab
✔ 실습을 통한 샘플 코드 만들기. Contribute to quddaz/my_Lab development by creating an account on GitHub.
github.com

끝
'Spring > 개인공부_실습' 카테고리의 다른 글
| [Spring] Spring AOP로 성능 측정하기 (0) | 2024.10.15 |
|---|---|
| [Spring]WebSocket과 STOMP을 이용한 실시간 채팅 및 채팅방 생성 (2) | 2024.10.11 |
| [Spring]API 문서화 - Swagger (0) | 2024.10.04 |
| [Spring]OAuth2.0 - 구현하기 (0) | 2024.07.30 |
| [Spring]OAuth2.0 - 필수 변수와 네이버 요청하기 (0) | 2024.07.30 |


